
How to set up and add a consent banner to your website
Learn how to setup, style, configure, and customize and install your cookie banner and cookie policy.
Jump ahead
- Creating your cookie banner and policy
- Styling your cookie banner
- Configuring your cookie banner's behavior
- Editing your cookie banner's content
- Installing your cookie banner
- Adding your cookie policy to your website
- Managing your website's cookies
Watch the video guide!
Creating your cookie banner & policy
- Sign in (or create) your GetTerms account.
- From the overview page, click the box that says cookie consent banner & cookie policy to start the cookie banner setup wizard.
- Input your contact details for data privacy related inquiries. This will be used for your cookie policy.
- Click Add Cookie Banner & Policy.
Your cookie banner has now been generated. GetTerms will automatically start scanning your website for cookies and categorizing them for you.

Styling your cookie banner
By default, your cookie banner will be set up with our recommended appearance settings and configured for global privacy compliance. If you’re happy with the default settings, you can skip straight to installing your cookie banner on your website.
After you save changes our system needs to rebuild and cache your banner before your changes can be seen live. This may take 5 -10 minutes. This timer resets each time you update your settings.

- Font size
- Background color
- Link text color
- Button text color
- Button color
- Reject all cookies button: Enabled/disabled per-region via the 'Configuration' page.
- Granular consent controls: Enabled/disabled per-region via the 'Configuration' page.
- Persistent icon to manage preferences: Enabled/disabled per-region via the 'Configuration' page.
Block page interaction until preferences are set
This setting encourages your users to set their cookie preferences before they interact with your site. We recommend enabling this if you're using a discrete banner style, such as the card, banner or pill. Using a discrete banner without blocking interaction may result in your tracking tags not firing and a loss of analytics data.
Configuring your cookie banner's behavior

- Google consent mode: Enables Google consent mode integration. When enabled you banner will send each user's consent signals to Google Platforms such as Google Analytics. Follow our setup guide.
- Region specific configuration: Set the behavior of your cookie banner based on each user's location.
- Script blocking: Blocks cookies and trackers until consent is given. Note: This will cause the page to reload whenever the user interacts with the banner to ensure scripts run correctly.
- Reject all cookies button: Adds a 'Reject All' to the first layer of your cookie banner. This is required in the EU and the UK, and strongly recommended in the USA and Canada.
- Global default banner configuration: Set the behavior of your cookie banner for users outside of the regions specified in the region specific configurations.
- Consent setting: Preset banner behaviors. We recommend leaving this set to the default setting.
- Opt-in (Recommended): A preset that blocks cookies until consent is given.
- Opt-out: A preset that only blocks cookies if the user withdraws consent.
- Custom: Gives you complete control over all settings.
- Use global default: Sets the region to follow the settings you've configured under 'Global default banner configuration'.
- No banner: Hides the banner for that region.
- Persistent icon to manage preferences: Enables the floating icon for reopening the consent modal.
- Allow granular consent controls: Enables the preferences button which allows users to consent to cookies based on their individual purpose (Marketing, Statistics, Functional). This is required for most countries, or if you are using Google consent mode.
USA specific settings

-
Respect Global Privacy Control (GPC) signals: The GPC signal allows users to opt out of data sales or the use of their data for cross-context targeted advertising for all sites they visit using a browser plugin.
Under the California Consumer Privacy Act (CCPA), sites must respect the Global Privacy Control (GPC) settings of residents of California.
- State-specific banner configuration: Set the cookie banner behavior for users in California.
- Show GPC detection notice?: Enables a message that informs users when their consent preferences are updated to reflect their GPC setting.
Once you're happy with your banner's configuration, click Save. As with the appearance settings, it will take about 2 minutes for your changes to display on your live banner. This timer resets each time you update your settings.
Editing your cookie banner's content
From the content page of your dashboard, you can customize all visible text on your cookie banner. Content is customizable on a per-language basis, meaning if you make a change to English (UK) it will have no impact on the other translations.
From here, you'll also be able to change the cookie policy link displayed on your cookie banner. By default, we will link to the generated cookie policy, hosted via our website in the relevant language.
Make sure that the language you're editing corresponds with the banner you've installed on your site.

Edit language:
We provide translations for English (UK), English (US), Hindi, Spanish, German, French, and Italian. In addition to this, we allow for one custom translation. Selecting a language from the edit language dropdown menu will open the content fields for the selected language.
This setting does not control the default language of your cookie banner. To change the default language your banner displays in, you'll need to navigate to the installation page.

Installing your cookie banner
There's 3 ways to install your banner:
- Embed it manually in the <head> section of your website (recommended)
- Install it via our WordPress Plugin
- Install it via Google Tag Manager (requires Google consent mode)
A note for WordPress users!
If you're using WordPress
- We always recommend that you use our plugin to install our banner. It's the easiest way to make sure our banner runs as early as possible.
- You must install the WP Consent API plugin, no matter how you choose to install our banner.
What is WP consent API?
WP Consent API is a plugin that shares your visitors’ consent choices with other WordPress plugins and themes.
Many plugins set cookies in their own way, which can make them hard to control with script blocking alone. Without this extra signal, some plugins may run and set cookies before consent is given.
Installing your cookie banner manually using an embed code
-
Go to the Installation tab of your consent banner and copy the consent banner embed script.
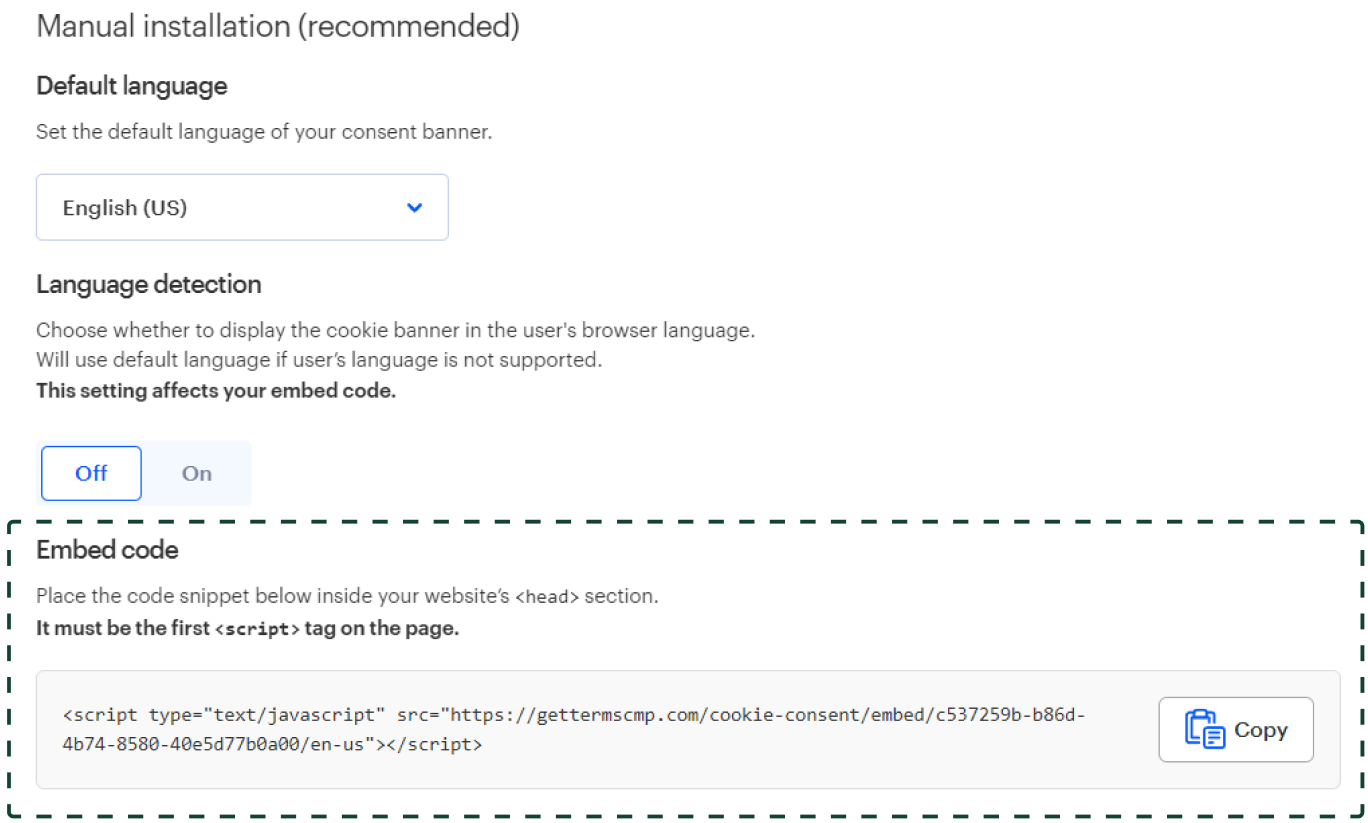
-
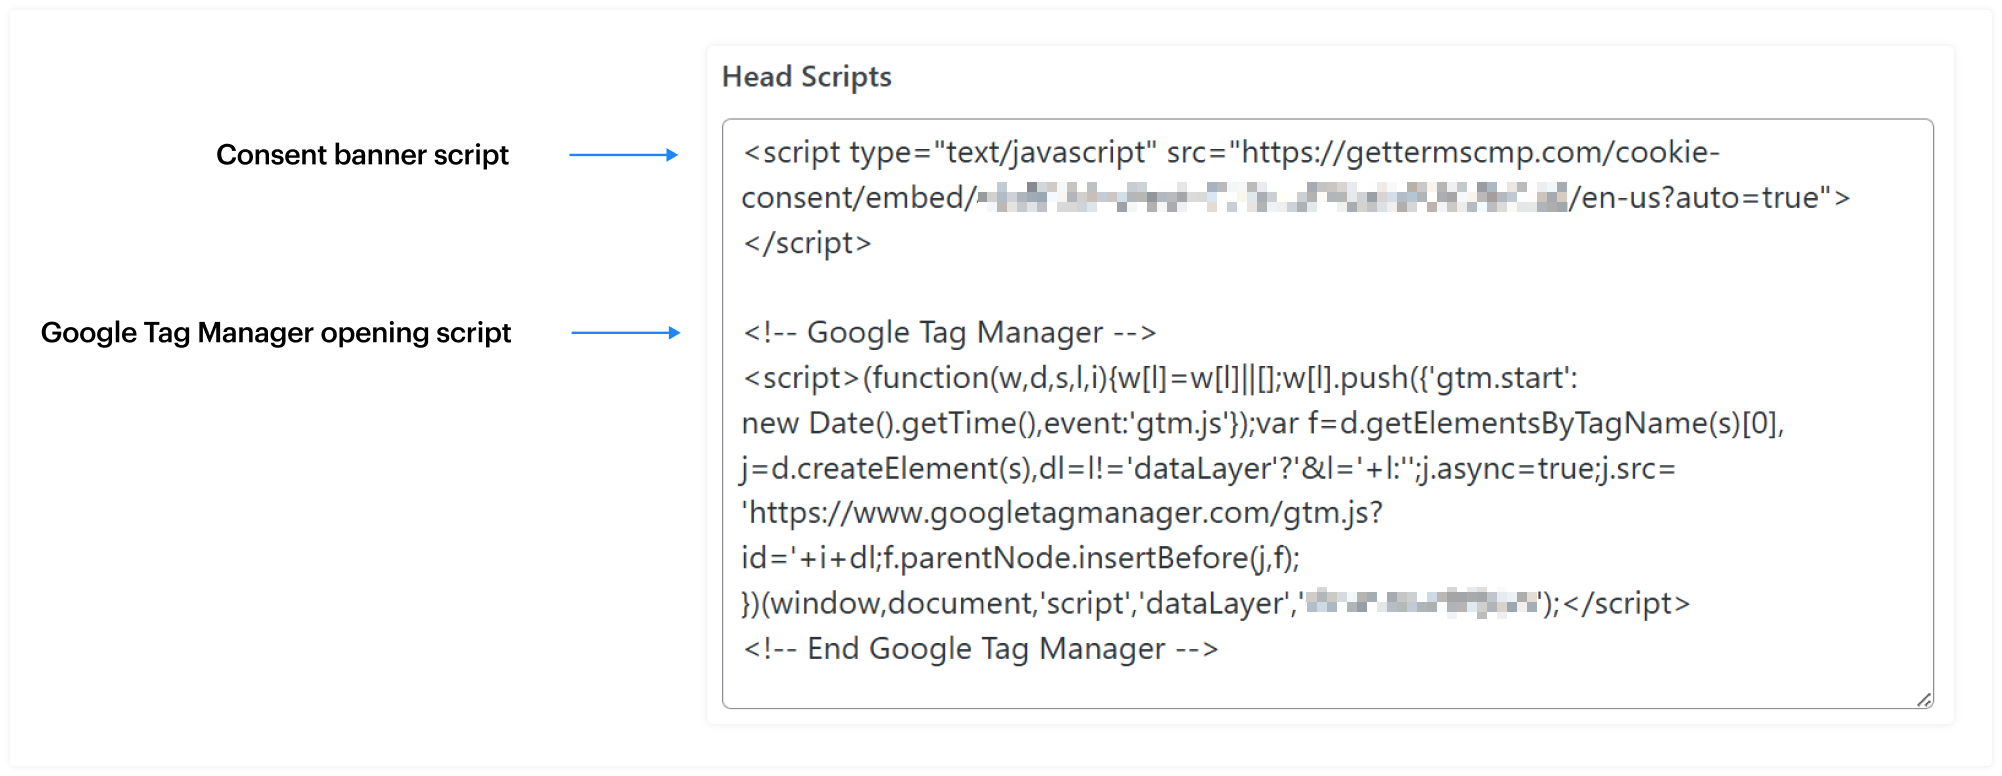
Paste this code as high in the <head> of the page as possible. It must be the first <script> in the head section of your website and before your Google Tag Manager installation code.

Installing your cookie banner with our WordPress plugin
Once you've installed our WordPress plugin, you can enable the cookie banner from the plugin settings.
If the plugin isn't behaving as expected, here's a list of common causes and how to fix them.
Installing your cookie banner with Google Tag Manager
If neither of the above options work for you, you can install our banner via Google Tag Manager.
Warning: This installation method reduces script blocking reliability and requires Google consent mode to be enabled. We don't recommend this method unless all your cookie scripts are installed and managed with GTM.
Adding your cookie policy to your website
From the side menu of your GetTerms dashboard, select your Cookie Policy. You should find it under 'Active Policies'.
We provide several ways for you to add your policies to your site.
- Embed them with a live code snippet
- Add them short codes via our WordPress plugin
- Link directly to a live version of your policy hosted on GetTerms
- Copy and paste it as html directly into your content editor
- Download it as a PDF and upload it to your site
Each of these options can be found at the top of each policies dedicated page in our dashboard.

Embedding your Cookie Policy
Embedding your policies adds a live version of your generated policy directly to a webpage on your site. This means if we alert you of a regulation change, you can quickly update your policy in our dashboard and these changes will be reflected on your website.
To embed your policy:
- Click the button labelled 'Embed Live Policy'. A box should popup with instructions on how to embed your policy
-
Copy the embed code. The language of the policy will reflect the default language you set on the company details page (the first thing you did after creating an account). You can see this reflected in the embed code snippet.
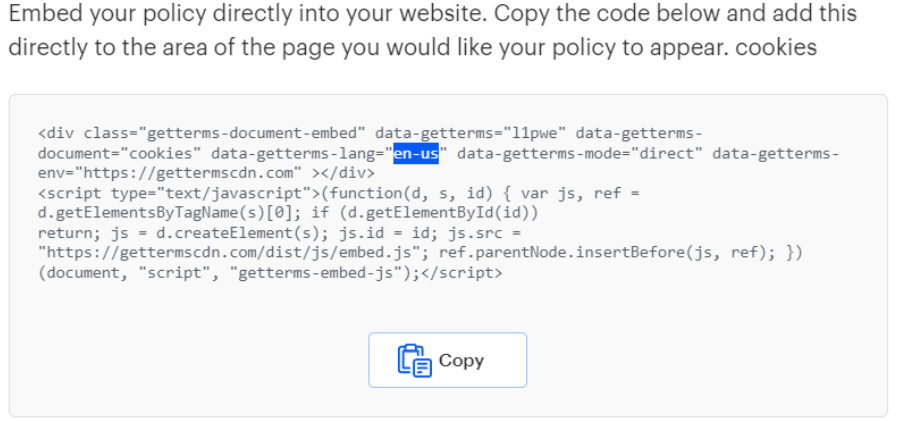
-
Paste the embed into the content editor of your website. If you're using a WYSIWYG editor, make sure you're using the HTML editor (often labelled 'Text'), rather than the rich text editor (often labelled 'Visual').
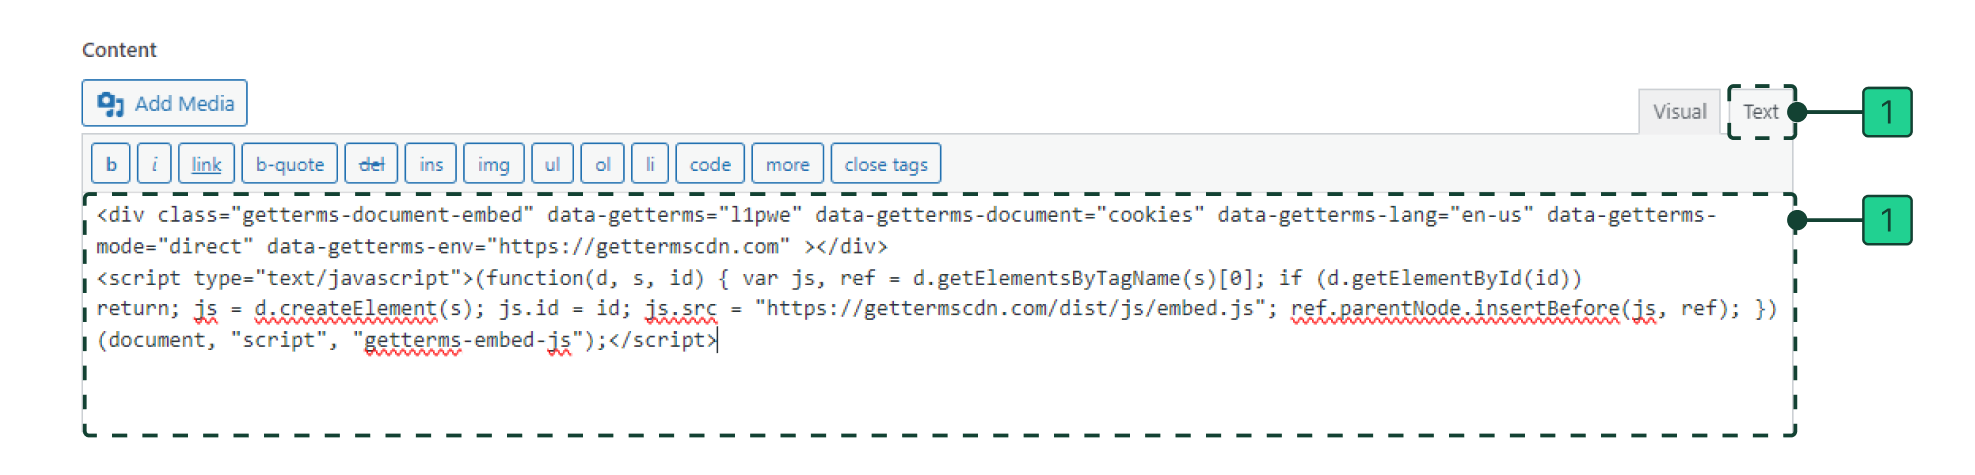
If you're using a website builder like Wix or SquareSpace, you'll need to add the code with an 'embed' or 'code' block.


Managing your website's cookies
While you’ve been setting up and installing your banner, our cookie scanner has been crawling your website, finding any active cookies and trackers and categorizing them for you. Any cookies found on the Cookie Management page, under Active Cookies, will be displayed on the second layer of your cookie banner.
You can add, edit, and remove any active cookie using the cookie editor.
- Click the dropdown of any of the cookie categories to display the active cookies belonging to the category.
- Click Add a cookie to add any cookies not found by our scanner. Cookies behind a login page or cart page may not be visible to our scanner.
- Click the pencil icon to open the cookie editor.
- Key: The unique name belonging to the cookie (e.g. _ga)
- Category: The category belonging to the tracking cookie
- Data controller: The name of the company responsible for creating the cookie, e.g. Google
- Platform: The platform the cookie is tied to
- Domain: The domain that sets the cookie; usually this is your domain
- Retention period: How long the cookie stays saved in the user’s browser before expiring
- Description: A description of what the cookie does, e.g. setting an ID that identifies unique users
- Click Save to save any edits made to a cookie.
- Click Back to report to go back to the Cookie Management page.
- Click the red subtract/delete button to remove a cookie from the active cookies and place it in the inactive cookies section. Inactive cookies won’t be displayed on your consent banner.
- Clicking Restore will place the cookie back in the active cookies section.
- Clicking the trash can will remove the cookie from the report entirely. Note: If the cookie is detected in a later scan, it will be re-added to the inactive cookies section automatically.